Filter raw reads by quality
Objectives
Visualising raw reads
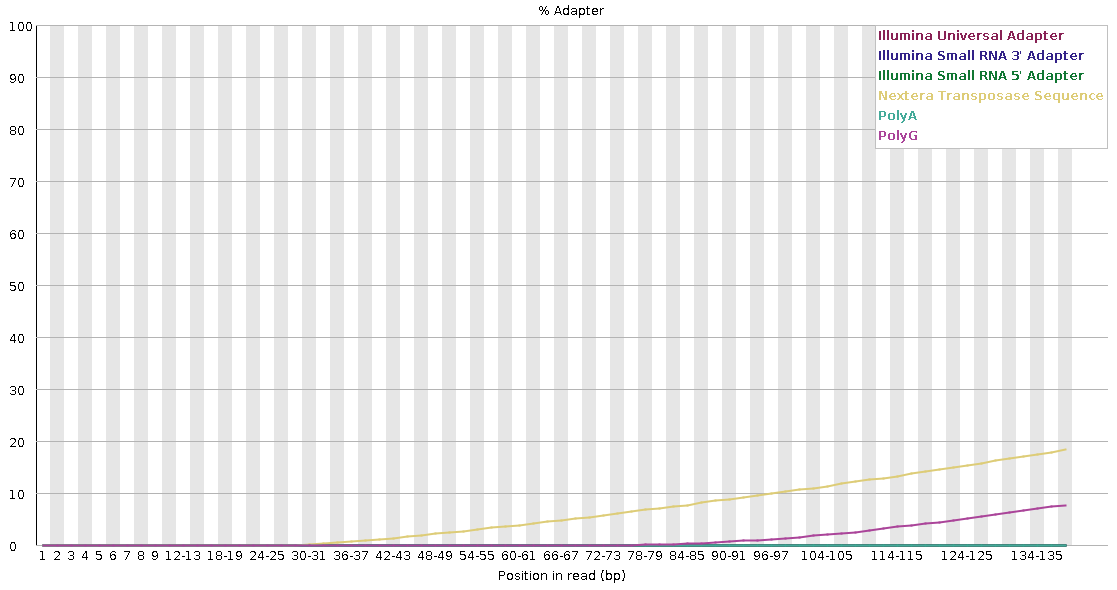
FastQC is an extremely popular tool for checking your sequencing libraries, as the visual interface makes it easy to identify the following issues:
- Adapter/barcode sequences
- Low quality regions of sequence
- Quality drop-off towards the end of read-pair sequence
Loading FastQC
These exercises will take place in the 2.fastqc/ directory. First, navigate to this directory. Copy the command below into your terminal (logged in to NeSI), replacing <YOUR FOLDER>, and then running the command.
To activate FastQC on NeSI, you need to first load the module using the command
Running FastQC
We will run FastQC from the command line as follows:
Viewing the outputs from FastQC
FastQC generates output reports in .html files that can be viewed in a standard web browser.
Fortunately, if you're currently using the terminal within Jupyter hub for today's session, we can open the .html files directly from here:
- Click on the directory icon in the top left to open the directory navigator pane (if not already open).
- The default viewed location will be the overall project that you have logged in to (in this case, the 'Genomics Aotearoa Virtual Lab Training Access (nesi02659)' project).
- Click through
MGSS_U, into your directory, and then into the2.fastqc/directory. - Double click on the output
...fastqc.htmlfiles to open them in the a new tab within theJupyter hub.
Examples of the output files are also available for download here.
Note that FastQC does not load the forward and reverse pairs of a library in the same window, so you need to be mindful of how your samples relate to each other.
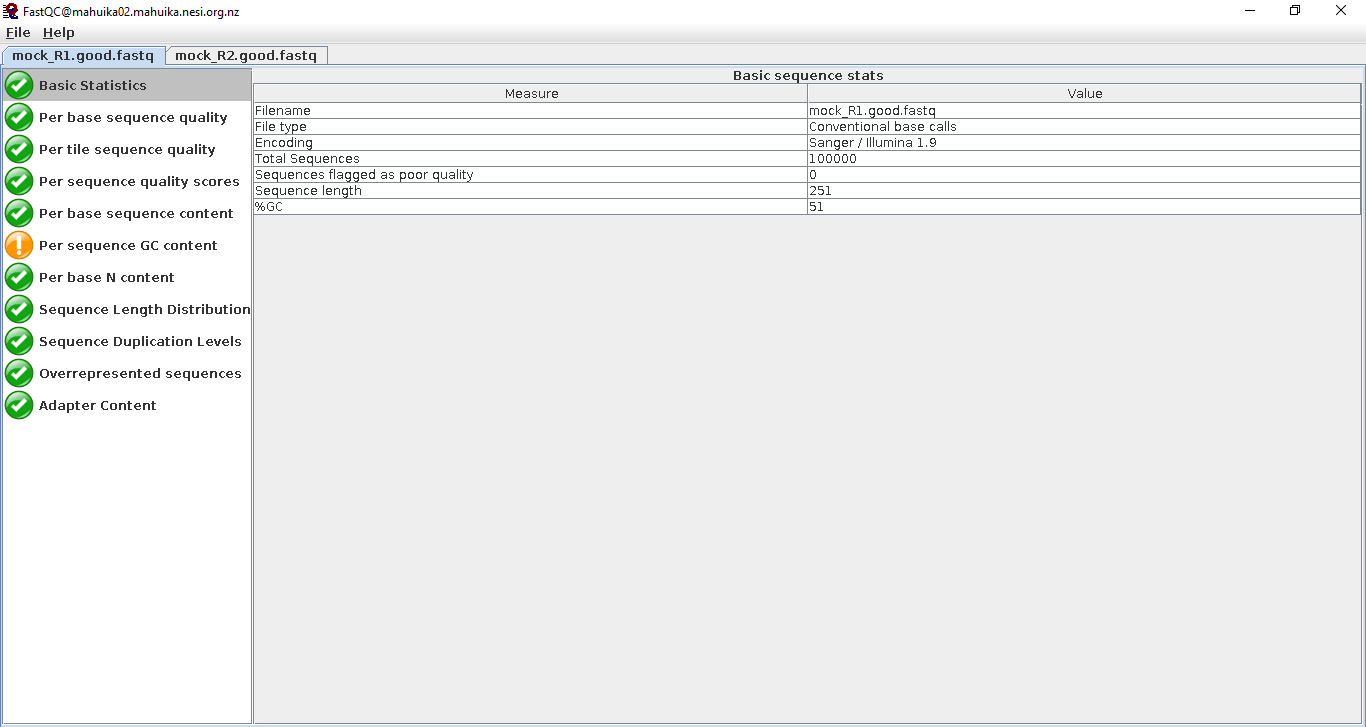
At a first glance, we can see the follow statistics:
- The data is stored in Sanger / Illumina 1.9 encoding. This will be important to remember when read trimming.
- There are 100,000 reads in the file
- The maximum sequence length is 251 base pairs. This is good to check, since the data were generated using Illumina 2x250 bp sequencing.
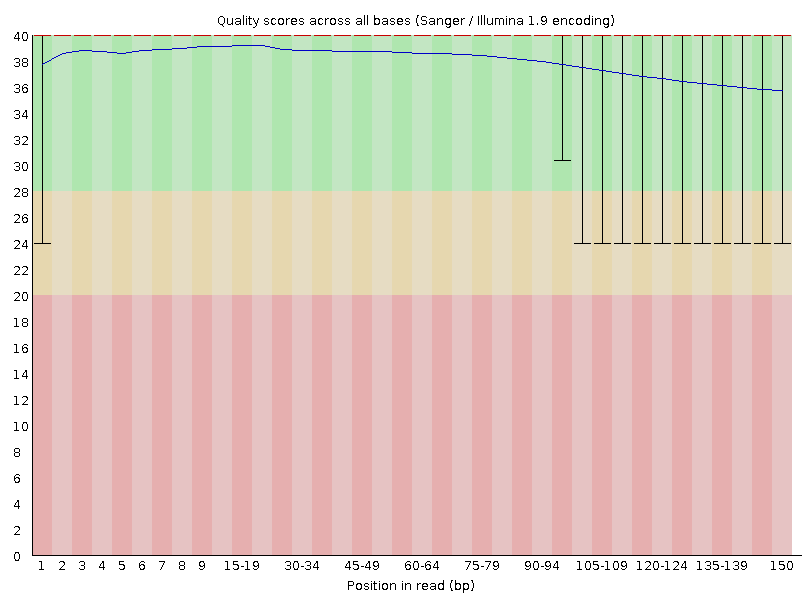
Have a quick look through the menu sidebar on the left. As you can see, the data has passed most of the basic parameters.


The only aspect of the data that FastQC is flagging as potentially problematic is the GC% content of the data set. This observation is expected as we deal with a mixed community and organisms. Therefore, it is unlikely that there will be a perfect normal distribution around an average value. For example, a community comprised of low- and high-GC organisms would manifest a bimodal distribution of peaks which would be a problematic outcome in terms of the expectations of FastQC, but completely consistent with the biology of the system.
FastQC outputs for libraries with errors
Lets take a look at a library with significant errors. Process the sequence file mock_R1.adapter_decay.fastq with FastQC.
Compare the results with the mock_R1.good.fastq.gz file.
Which of the previous fields we examined are now flagged as problematic? How does this compare with your expectation? Are there any which should be flagged which are not?
Combining FastQC outputs using MultiQC
In this workshop, there are only few fastq files to work with. However, for an actual metagenomics experiment/survey, there might be 100s of files to QC. Here, we can use MultiQC to aggregate all of the reports generated by FastQC into one HTML file.
In the command above, MultiQC is directed to look for relevant files in the current directory and produce a browser-friendly HTML report there.
Read trimming and adapter removal with trimmomatic

There are a multitude of programs which can be used to quality trim sequence data and remove adapter sequence. For this exercise we are going to use trimmomatic, but this should in no way be interpreted as an endorsement of trimmomatic over equivalent tools like BBMap, sickle, cutadapt or any other.
For a first run with trimmomatic, type the following commands into your console:
module load Trimmomatic/0.39-Java-1.8.0_144

# Run Trimmomatic
trimmomatic PE -threads 4 -phred33 \
               mock_R1.adapter_decay.fastq.gz mock_R2.adapter_decay.fastq.gz \
               mock_R1.qc.fastq.gz mock_s1.qc.fastq.gz mock_R2.qc.fastq.gz mock_s2.qc.fastq.gz \
               ILLUMINACLIP:NexteraPE-PE.fa:1:25:7 SLIDINGWINDOW:4:30 MINLEN:80
There is a lot going on in this command, so here is a breakdown of the parameters in the command above
| Parameter | Type | Description |
|---|---|---|
PE |
positional | Specifies whether we are analysing single- or paired-end reads |
-threads 2 |
keyword | Specifies the number of threads to use when processing |
-phred33 |
keyword | Specifies the fastq encoding used |
mock_R1.adapter_decay.fastq.gz / mock_R2.adapter_decay.fastq.gz |
positional | The paired forward and reverse reads to trim |
mock_R1.qc.fastq.gz |
positional | The file to write forward reads which passed quality trimming, if their reverse partner also passed |
mock_s1.qc.fastq.gz |
positional | The file to write forward reads which passed quality trimming, if their reverse partner failed (orphan reads) |
mock_R2.qc.fastq.gz / mock_s2.qc.fastq.gz |
positional | The reverse-sequence equivalent of above |
ILLUMINACLIP:NexteraPE-PE.fa:1:25:7 |
positional | Adapter trimming allowing for 1 seed mismatch, palindrome clip score threshold of 25, and simple clip score threshold of 7 |
SLIDINGWINDOW:4:30 |
positional | Quality filtering command. Analyse each sequence in a 4 base pair sliding window and then truncate if the average quality drops below Q30 |
MINLEN:80 |
positional | Length filtering command. Discard sequences that are shorter than 80 base pairs after trimming |
Terminal output
TrimmomaticPE: Started with arguments:
 -threads 4 -phred33 mock_R1.adapter_decay.fastq.gz mock_R2.adapter_decay.fastq.gz mock_R1.qc.fastq.gz mock_s1.qc.fastq.gz mock_R2.qc.fastq.gz mock_s2.qc.fastq.gz ILLUMINACLIP:NexteraPE-PE.fa:1:25:7 SLIDINGWINDOW:4:30 MINLEN:80
Using PrefixPair: 'AGATGTGTATAAGAGACAG' and 'AGATGTGTATAAGAGACAG'
Using Long Clipping Sequence: 'GTCTCGTGGGCTCGGAGATGTGTATAAGAGACAG'
Using Long Clipping Sequence: 'TCGTCGGCAGCGTCAGATGTGTATAAGAGACAG'
Using Long Clipping Sequence: 'CTGTCTCTTATACACATCTCCGAGCCCACGAGAC'
Using Long Clipping Sequence: 'CTGTCTCTTATACACATCTGACGCTGCCGACGA'
ILLUMINACLIP: Using 1 prefix pairs, 4 forward/reverse sequences, 0 forward only sequences, 0 reverse only sequences
Input Read Pairs: 2000000 Both Surviving: 1160013 (58.00%) Forward Only Surviving: 340638 (17.03%) Reverse Only Surviving: 124184 (6.21%) Dropped: 375165 (18.76%)
TrimmomaticPE: Completed successfully
After Trimmomatic has completed, run FastQC again to check how well your reads have done.
Working with the ILLUMINACLIP command
Adapter trimming in Trimmomatic is called via the ILLUMINACLIP command, which can be used to pass a FASTA file of adapter and barcode sequences to be found and removed from your data. For further information about the ILLUMINACLIP command, please refer to the trimmomatic manual for a detailed description.
There is always some subjectivity in how sensitive you want your adapter (and barcode) searching to be. If the settings are too strict you might end up discarding real sequence data that only partially overlaps with the Illumina adapters. If your settings are not strict enough then you might leave partial adapters in the sequence. For short inserts (DNA fragments), the sequencing process can read through into the adapter on the other side (3'), thus adapters need to be removed prior to quality-based trimming as the chance of hitting adapters (thus, removing them) is highest when the sequence is longer.
Running the trimmed files back through FastQC, we can see that this significantly improves the output.

Considerations when working with trimmomatic
Order of operations
The basic format for a trimmomatic command is
The trimming parameters are processed in the order you specify them. This is a deliberate behaviour, but can have some unexpected consequences for new users.
For example, consider these two scenarios:
code
In the first run, we would not expect any sequence shorter than 80 base pairs to exist in the output files. However, we might encounter them in the second command. This is because in the second command we remove sequences shorter than 80 base pairs, then perform quality trimming. If a sequence is trimmed to a length shorter than 80 base pairs after trimming, the MINLEN filtering does not execute a second time. In the first instance, we do not perform trimming before size selection, so any reads that start longer than 80 base pairs, but are trimmed to under 80 base pairs during quality trimming will be caught in the MINLEN run.
Diagnosing poor libraries
Whether a library is 'poor' quality or not can be a bit subjective. These are some aspects of the library that you should be looking for when evaluating FastQC:
- Does the sequencing length match what you ordered from the facility?
- If the sequences are shorter than expected, is adapter read-through a concern?
- What does the sequence quality look like for the whole length of the run? Are there any expected/unexpected regions of quality degradation?
- Are adapters and/or barcodes removed?
- Look at the Per base sequence content to diagnose this.
- Is there unexpected sequence duplication?
- This can occur when low-input library preparations are used.
- Are over-represented k-mers present?
- This can be a sign of adapter and barcode contamination.
Understanding common issues and best practices
- Do I need to remove (rare) adapters?
- I don’t know if adapters have been removed or not
- How do I identify and remove adapter read-through?
- Identifying incomplete barcode/adapter removal
- Over aggressive trimming
- GC skew is outside of expected range
Filtering out host DNA
Metagenome data derived from host-associated microbial communities should ideally be filtered to remove any reads originating from host DNA. This may improve the quality and efficiency of downstream data processing (since we will no longer be processing a bunch of data that we are likely not interested in), and is also an important consideration when working with metagenomes that may include data of a sensitive nature (and which may also need to be removed prior to making the data publicly available). This is especially important for any studies involving human subjects or those involving samples derived from Taonga species.
There are several approaches that can be used to achieve this. The general principle is to map your reads to a reference genome (e.g. human genome) and remove those reads that map to the reference from the dataset.
Note
This process may be more complicated if a reference genome for your host taxa is not readily available. In this case an alternative method would need to be employed (for example: predicting taxonomy via Kraken2 and then filtering out all reads that map to the phylum or kingdom of your host taxa).
This exercise provides an example using BBMap to map against a masked human reference genome and retain only those reads that do not map to the reference. Here we are mapping some mock human microbiome reads against a pre-prepared human genome that has been processed to mask sections of the genome, including those that:
- are presumed microbial contaminant in the reference
- have high homology to microbial genes/genomes (e.g. ribosomes)
- those that are of low complexity
This ensures that reads that would normally map to these sections of the human genome are not removed from the dataset (as genuine microbial reads that we wish to retain might also map to these regions), while all reads mapping to the rest of the human genome are removed.
Note
The same process can be used to remove DNA matching other hosts (e.g. mouse), however you would need to search if anyone has prepared (and made available) a masked version of the reference genome, or create a masked version using bbmask. The creator of BBMap has made available masked human, mouse, cat, and dog genomes. More information, including links to these references and instructions on how to generate a masked genome for other taxa, can be found within this thread.*
The masked human reference genome
The masked reference genome is available via Google drive and Zenodo. For this workshop, we have provided you with the file within the 2.fastqc/BBMask_human_reference/ directory.
Downloading your own copy of the masked genome
We can use gdown to download this file from Google drive via the command line.
To install gdown, we can use pip.
Install gdown
Next, download the reference. It will also be necessary to first add your local bin location to the PATH variable via the export PATH=... command, as this is where gdown is located (modify <your_username> before running the code below).
Indexing the reference genome and read mapping with BBMap
We will cover more about read mapping in later exercises. For now, it is important to know that it is first necessary to build an index of the reference using the read mapping tool of choice. Here, we will first build a BBMap index, and then use BBMap to map the reads to that index, ultimately retaining only those reads that do not map to the index.
Build index reference via BBMap. We will do this by submitting the job via slurm.
Create a new script named host_filt_bbmap_index.sl using nano:
Remember to update <YOUR FOLDER> to your own folder
code
Save your script by pressing Ctrl + o , then exit the editor by pressing Ctrl + x .
Submit your newly created script to the scheduler as follows:
Finally, map the reads to the reference via BBMap. Here we will submit the job as a slurm array, with one array job per sample.
Again, we will create a script using nano:
code
BBMap parameters
| Parameter | Description |
|---|---|
-Xmx27g |
Set maximum memory allocation to match #SBATCH --mem) |
-t |
Set number of threads (CPUs) to match #SBATCH --cpus-per-task |
| All flags in line 22 | Recommended parameters found within this thread about processing data to remove host reads |
in1 / in2 |
Input paired-end reads 1 and 2 stored in 3.assembly/, each of which are "samples". These are the same files we will use in further lessons |
path |
The parent directory where ref/ (our indexed and masked reference) exists |
outu1 / outu2 |
Reads that were not mapped to our masked reference written to host_filtered_reads/ |
We'll submit the mapping script:
Monitoring job progress
We can monitor our job progress using squeue --me or sacct <job_id>. This will be covered in detail as part of the main content when we evaluate assemblies.
Array jobs
Slurm array jobs automatically create a variable SLURM_ARRAY_TASK_ID for that job, which contains the array task number (i.e. between 1 and 4 in the case above). We use this to run the command on the sample that matches this array task ID. I.e. array job 3 will run the commands on "sample3" (sample${SLURM_ARRAY_TASK_ID} is read in as sample3).
The filtered reads are now available in host_filtered_reads/ for downstream use.