Streams, Redirection and Pipe
Lesson Objectives
- To be able to redirect streams of data in Unix.
- Solve problems by piping several Unix commands.
- Command substitution
Bioinformatics data is often text-based and large. This is why Unix’s philosophy of handling text streams is useful in bioinformatics: text streams allow us to do processing on a stream of data rather than holding it all in memory. Handling and redirecting the streams of data is an essential skill in Unix.
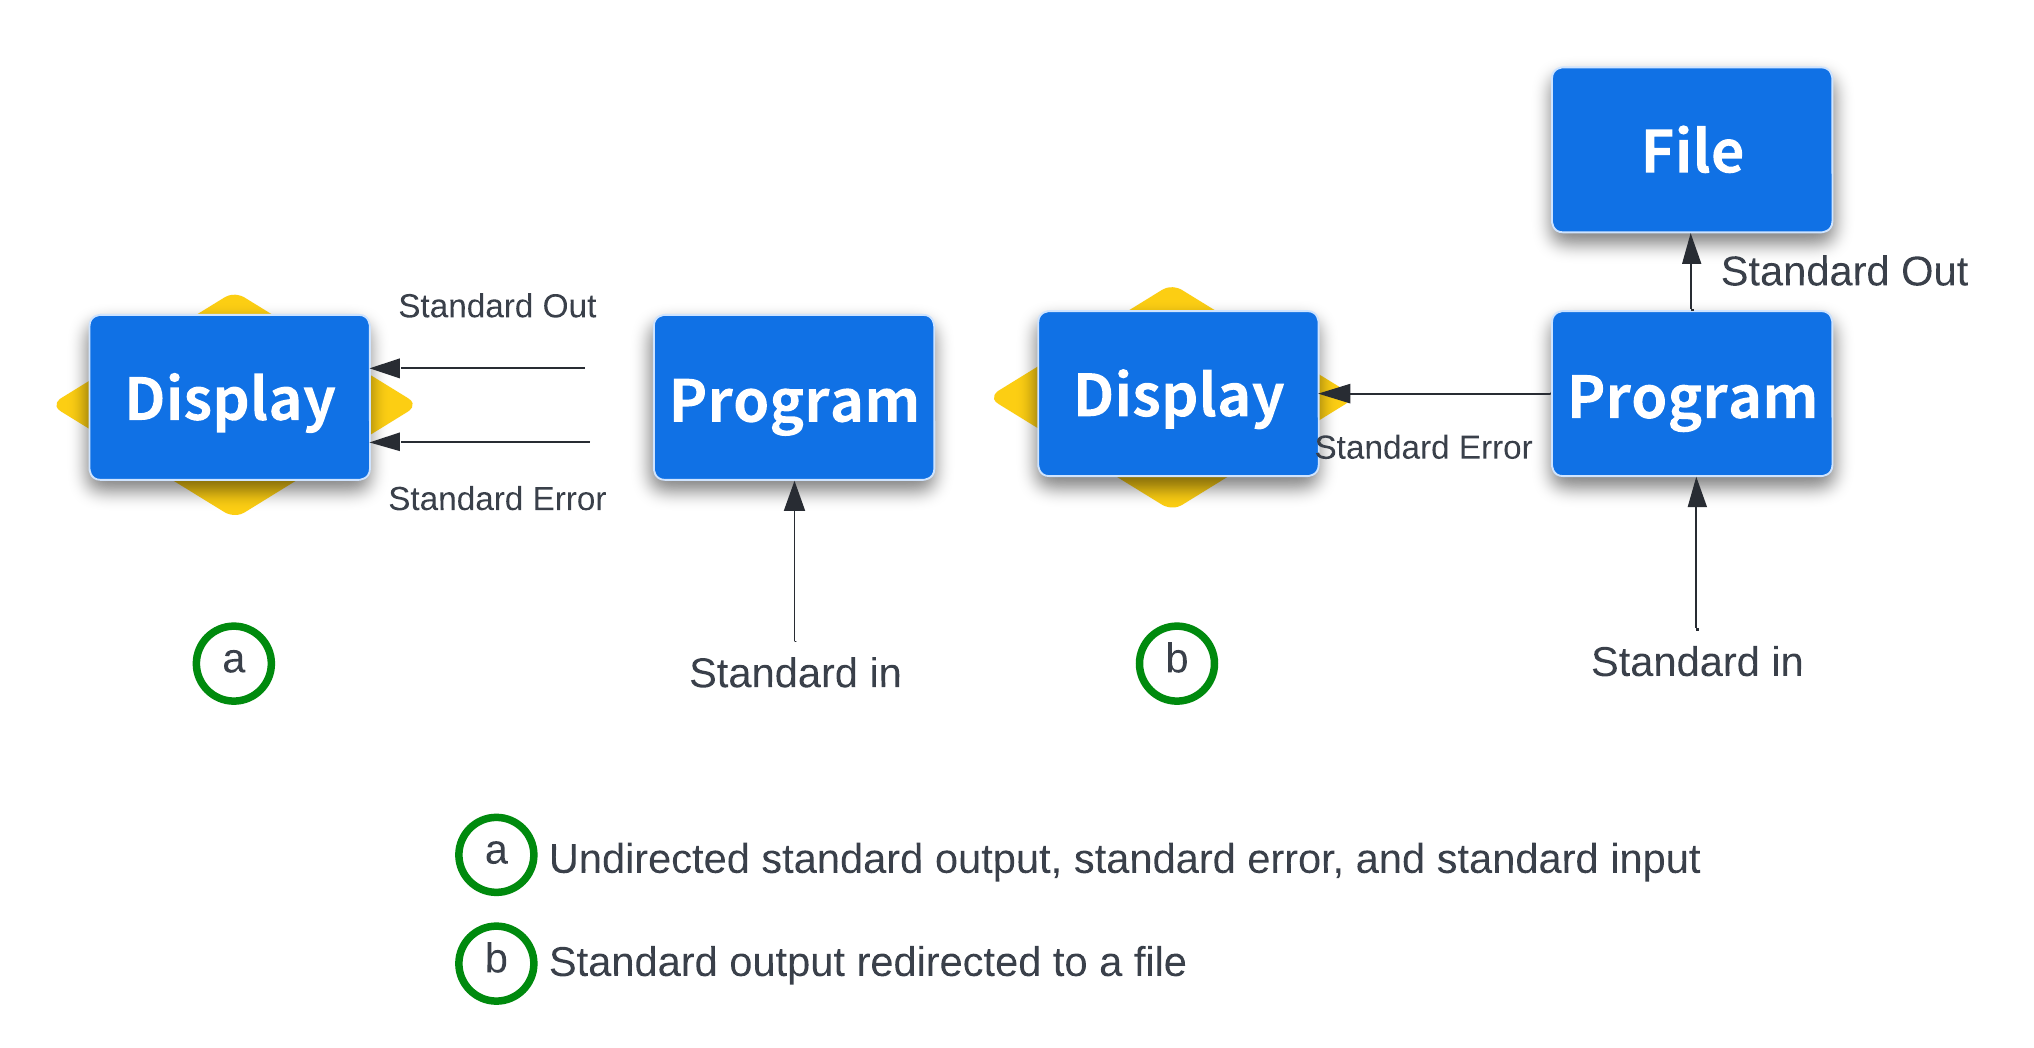
By default, both standard error and standard output of most unix programs go to your terminal screen. We can change this behavior (redirect the streams to a file) by using > or >> operators. The operator > redirects standard output to a file and overwrites any existing contents of the file, whereas >> appends to the file. If there isn’t an existing file, both operators will create it before redirecting output to it.
Output redirection
The shell4b_data directory contains the following fasta files:
We can use the cat command to view these files either one at a time:
Recap - cat command to view the content of a file
code
output
>teosinte-branched-1 protein
LGVPSVKHMFPFCDSSSPMDLPLYQQLQLSPSSPKTDQSSSFYCYPCSPP
FAAADASFPLSYQIGSAAAADATPPQAVINSPDLPVQALMDHAPAPATEL
GACASGAEGSGASLDRAAAAARKDRHSKICTAGGMRDRRMRLSLDVARKF
FALQDMLGFDKASKTVQWLLNTSKSAIQEIMADDASSECVEDGSSSLSVD
GKHNPAEQLGGGGDQKPKGNCRGEGKKPAKASKAAATPKPPRKSANNAHQ
VPDKETRAKARERARERTKEKHRMRWVKLASAIDVEAAAASVPSDRPSSN
NLSHHSSLSMNMPCAAA
OR all at once with cat *.fasta
We can also redirect the output to create a new file containing the sequence for both proteins:
Now we have a new file called zea-proteins.fasta. Let's check the contents:
code
output
>teosinte-branched-1 protein
LGVPSVKHMFPFCDSSSPMDLPLYQQLQLSPSSPKTDQSSSFYCYPCSPP
FAAADASFPLSYQIGSAAAADATPPQAVINSPDLPVQALMDHAPAPATEL
GACASGAEGSGASLDRAAAAARKDRHSKICTAGGMRDRRMRLSLDVARKF
FALQDMLGFDKASKTVQWLLNTSKSAIQEIMADDASSECVEDGSSSLSVD
GKHNPAEQLGGGGDQKPKGNCRGEGKKPAKASKAAATPKPPRKSANNAHQ
VPDKETRAKARERARERTKEKHRMRWVKLASAIDVEAAAASVPSDRPSSN
NLSHHSSLSMNMPCAAA
>teosinte-glume-architecture-1 protein
DSDCALSLLSAPANSSGIDVSRMVRPTEHVPMAQQPVVPGLQFGSASWFP
RPQASTGGSFVPSCPAAVEGEQQLNAVLGPNDSEVSMNYGGMFHVGGGSG
GGEGSSDGGT
Capturing error messages
code
>teosinte-branched-1 protein LGVPSVKHMFPFCDSSSPMDLPLYQQLQLSPSSPKTDQSSSFYCYPCSPP FAAADASFPLSYQIGSAAAADATPPQAVINSPDLPVQALMDHAPAPATEL GACASGAEGSGASLDRAAAAARKDRHSKICTAGGMRDRRMRLSLDVARKF FALQDMLGFDKASKTVQWLLNTSKSAIQEIMADDASSECVEDGSSSLSVD GKHNPAEQLGGGGDQKPKGNCRGEGKKPAKASKAAATPKPPRKSANNAHQ VPDKETRAKARERARERTKEKHRMRWVKLASAIDVEAAAASVPSDRPSSN NLSHHSSLSMNMPCAAA cat: mik.fasta: No such file or directory
There are two different types of output there: standard output (the contents of the tb1-protein.fasta file) and standard error (the error message relating to the missing mik.fasta file). If we use the > operator to redirect the output, the standard output is captured, but the standard error is not - it is still printed to the screen. Let's check:
The new file has been created and contains the standard output (contents of the file tb1-protein.fasta):
code
output
>teosinte-branched-1 protein
LGVPSVKHMFPFCDSSSPMDLPLYQQLQLSPSSPKTDQSSSFYCYPCSPP
FAAADASFPLSYQIGSAAAADATPPQAVINSPDLPVQALMDHAPAPATEL
GACASGAEGSGASLDRAAAAARKDRHSKICTAGGMRDRRMRLSLDVARKF
FALQDMLGFDKASKTVQWLLNTSKSAIQEIMADDASSECVEDGSSSLSVD
GKHNPAEQLGGGGDQKPKGNCRGEGKKPAKASKAAATPKPPRKSANNAHQ
VPDKETRAKARERARERTKEKHRMRWVKLASAIDVEAAAASVPSDRPSSN
NLSHHSSLSMNMPCAAA
If we want to capture the standard error we use the (slightly unweildy) 2> operator:
Descriptors
File descriptor 2 represents standard error (other special file descriptors include 0 for standard input and 1 for standard output).
Check the contents:
Reminder :> vs >>
Note that > will overwrite an existing file. We can use >> to add to a file instead of overwriting it:
code
output
>teosinte-branched-1 protein
LGVPSVKHMFPFCDSSSPMDLPLYQQLQLSPSSPKTDQSSSFYCYPCSPP
FAAADASFPLSYQIGSAAAADATPPQAVINSPDLPVQALMDHAPAPATEL
GACASGAEGSGASLDRAAAAARKDRHSKICTAGGMRDRRMRLSLDVARKF
FALQDMLGFDKASKTVQWLLNTSKSAIQEIMADDASSECVEDGSSSLSVD
GKHNPAEQLGGGGDQKPKGNCRGEGKKPAKASKAAATPKPPRKSANNAHQ
VPDKETRAKARERARERTKEKHRMRWVKLASAIDVEAAAASVPSDRPSSN
NLSHHSSLSMNMPCAAA
>teosinte-glume-architecture-1 protein
DSDCALSLLSAPANSSGIDVSRMVRPTEHVPMAQQPVVPGLQFGSASWFP
RPQASTGGSFVPSCPAAVEGEQQLNAVLGPNDSEVSMNYGGMFHVGGGSG
GGEGSSDGGT
The Unix pipe
The pipe operator (|) passes the output from one command to another command as input. The following is an example of using a pipe with the grep command.
Steps:
- Remove the header information for the sequence (line starts with ">")
- Highlight any characters in the sequence that are not A, T, C or G.
We will use grep to carry out the first step, and then use the pipe operator to pass the output to a second grep command to carry out the second step.
Here is the full command:
Let's run the code:
code
Output
CCCCAAAGACGGACCAATCCAGCAGCTTCTACTGCTAYCCATGCTCCCCTCCCTTCGCCGCCGCCGACGC
Combining pipes and redirection
redirect the standard output of above grep.. command to non-atcg.txt
since we are redirecting to a text file, the --color by itself will not record the colour information. We can achieve this by invoking always flag for --color.i.e..
Using tee to capture intermediate outputs
code
The file intermediate-out.txt will contain the output from grep -v "^>" tb1.fasta, but tee also passes that output through the pipe to the next grep command.
Preview - This is to be covered in "Advanced Shell for Bioinformatics"
Pipes and Chains and Long running processes : Exit Status (Programmatically Tell Whether Your Command Worked)
How do you know when they complete? How do you know if they successfully finished without an error? Unix programs exit with an exit status, which indicates whether a program terminated without a problem or with an error. By Unix standards, an exit status of 0 indicates the process ran successfully, and any nonzero status indicates some sort of error has occurred (and hopefully the program prints an understandable error message, too). The exit status isn’t printed to the terminal, but your shell will set its value to a shell variable named $?. We can use the echo command to look at this variable’s value after running a command:
&&), and one operator that runs the next command only if the first completed unsuccessfully (||).
For example, the sequence program1 input.txt > intermediate-results.txt && program2 intermediate-results.txt > results.txt will execute the second command only if previous commands have completed with a successful zero exit status.
By contrast, program1 input.txt > intermediate-results.txt || echo "warning: an error occurred" will print the message if error has occurred.
When a script ends with an exit that has no parameter, the exit status of the script is the exit status of the last command executed in the script (previous to the exit).
Exit Status : using && and ||
To test your understanding of && and ||, we’ll use two Unix commands that do nothing but return either exit success (true) or exit failure (false). Predict and check the outcome of the following commands:
true
echo $?
false
echo $?
true && echo "first command was a success"
true || echo "first command was not a success"
false || echo "first command was not a success"
false && echo "first command was a success"
hint
The $? variable represents the exit status of the previous command.
Answer
Command Substitution
Unix users like to have the Unix shell do the work for them. This is why shell expansions like wildcards and brace expansion exist. Another type of useful shell expansion is command substitution. Command substitution runs a Unix command inline and returns the output as a string that can be used in another command. This opens up a lot of useful possibilities. For example, if you want to include the results from executing a command into a text, you can type:
Which is better ?
echo: This is a command that prints text to the standard output.- The text in quotes is what will be printed, with a substitution: "There are ... entries in my FASTA file."
$(...): This is command substitution. It runs the command inside the parentheses and replaces itself with the output of that command.-
grep -c '^@' SRR097977.fastq: This is the command inside the substitution:-c: An option that tells grep to count matching lines instead of printing them'^@': The pattern to search for. In this case, it's looking for lines that start with '@'
-
So, this command will:
- Count how many lines in SRR097977.fastq start with '@'
- Substitute that number into the echo statement
- Print the resulting message!
Another example of using command substitution would be creating dated directories:
Extra: Shell variables, environment and subshell
Shell variables
We've already been creating and using shell variables – in the for loop above (bonus content recap from intro R) file and name were both shell variables, reassigned each time through the loop. The shell also sets some variables for you automatically, like $USER:
You can create your own the same way:
No spaces around =
myvar = "hello" will not work – the shell interprets this as trying to run a command called myvar with arguments = and hello. It must be myvar="hello", no spaces.
To see all the shell variables currently defined (including functions), use set:
This is often a long list, so we can pipe into less to let us page through it (press q to quit), or you can use grep to show any lines with the text myvar.
Environment variables
A plain shell variable like myvar only exists in your current shell. If you run a bash script, that script starts up as its own separate process - it won't automatically see variables from your current shell.
To make a variable visible to scripts and other programs you run, we need to export it - this turns it into an environment variable:
To see all currently exported (environment) variables, use env:
setshows all shell variables and functions (local to this shell)envshows only the exported ones (visible to scripts and other programs too)
$PATH is a good example of a variable that needs to be exported - it tells the shell where to look for programs, and every program you run needs to be able to see it.
Where do all these variables come from?
set and env often show dozens of variables you never typed yourself. These come from a few places:
- The system, before bash even starts (e.g.,
$HOME,$USER,$SHELL) - System-wide startup files, which may apply to every user on the machine
- Your own
~/.bashrc, which is re-run every time you open a new interactive shell - Anything exported manually during your current session (like our
export myvar="hello"above) - these only last until you close that shell
Removing variables
unset variableremoves the variable completelyexport -n variableremoves just the export attribute - the variable still exists in your current shell, but it's just no longer passed on to scripts or other programs.
code
.bashrc
Every time you open a new interactive shell (e.g., a new terminal, or logging into REANNZ), bash reads a startup file called .bashrc in your home directory (if you are working on macOS, your default shell is likely zsh and you will have a .zshrc file instead). This is where people commonly set things they want available every time, without having to retype them, for example:
- setting
$PS1to customise your prompt - defining aliases, e.g.
alias ll='ls -lh' - exporting
$PATHadditions, so the shell can find tools you've installed
You might, for example, add lines like:
This is just an example, we won't change these today. Some version of these already exist in your .bashrc on REANNZ
Save, then either open a new terminal or re-read the file into your current shell with:
Notice PATH is exported but PS1 and the alias aren't - that's because PATH needs to be visible to other programs you run, whereas your prompt and aliases are only ever used by your interactive shell itself.
Subshell: Grouping commands with ( )
We've already used ; to run multiple commands one after another on a single line:
Sometimes we want to treat a sequence of commands like this as a single unit - for example, so we can send the same input to all of them, or redirect all of their output together. We can do this by wrapping the commands in parentheses ( ). This creates what's called a subshell - a separate instance of the shell that runs just those commands, as a group.
Redirecting input with <
Before we combine subshells with redirection, a quick recap: so far we've used > to redirect a command's output to a file. We can also redirect a file's contents into a command as input, using <. For example, instead of:
we could write:
Both give the same result here - head just receives the file's contents as input rather than being told a filename directly.
Combining ( ) and <
The real benefit of grouping commands with ( ) shows up when we want to send one file as input to several commands at once, rather than specifying the file separately for each:
Without the ( ), < would only apply to the command written right next to it - tail - and head would run with no input at all, just sitting and waiting for you to type something at the keyboard. Wrapping both commands in ( ) lets the single redirect apply to the pair together.
Grouping output
( ) isn't just for input - it's just as handy for combining several commands' output into a single redirect. For example, instead of writing to report.txt twice:
we can group the commands and redirect once:
Careful: commands share the same input stream
When several commands in ( ) all read from the same redirected input, they don't each get their own separate copy of the file - they share one stream, and each command consumes however much of it they read. Whatever one command uses up is gone by the time the next command runs.
head and tail worked well together above because head only reads the first few lines it needs, leaving the rest of the stream for tail. But some commands read the entire input, which can leave nothing for whatever runs after them:
code
wc -l reads through the whole file to count its lines, consuming the entire stream in the process. By the time head -n 10 runs, there's nothing left to read - so it prints nothing at all.
Key takeaway: ( ) with a shared < input works cleanly when the commands only take the part of the stream they need (like head/tail), but can behave unexpectedly if one command reads everything before the next has a turn.