Working with job scheduler

Introduction to slurm scheduler and directives
An HPC system might have thousands of nodes and thousands of users. How do we decide who gets what and when? How do we ensure that a task is run with the resources it needs? This job is handled by a special piece of software called the scheduler. On an HPC system, the scheduler manages which jobs run where and when. In brief, scheduler is a
- Mechanism to control access by many users to shared computing resources
- Queuing / scheduling system for users’ jobs
- Manages the reservation of resources and job execution on these resources
- Allows users to “fire and forget” large, long calculations or many jobs (“production runs”)
A bit more on why do we need a scheduler ?
- To ensure the machine is utilised as fully as possible
- To ensure all users get a fair chance to use compute resources (demand usually exceeds supply)
- To track usage - for accounting and budget control
- To mediate access to other resources e.g. software licences
Commonly used schedulers
- Slurm
- PBS , Torque
- Grid Engine
All NeSI clusters use Slurm (Simple Linux Utility for Resource Management) scheduler (or job submission system) to manage resources and how they are made available to users.
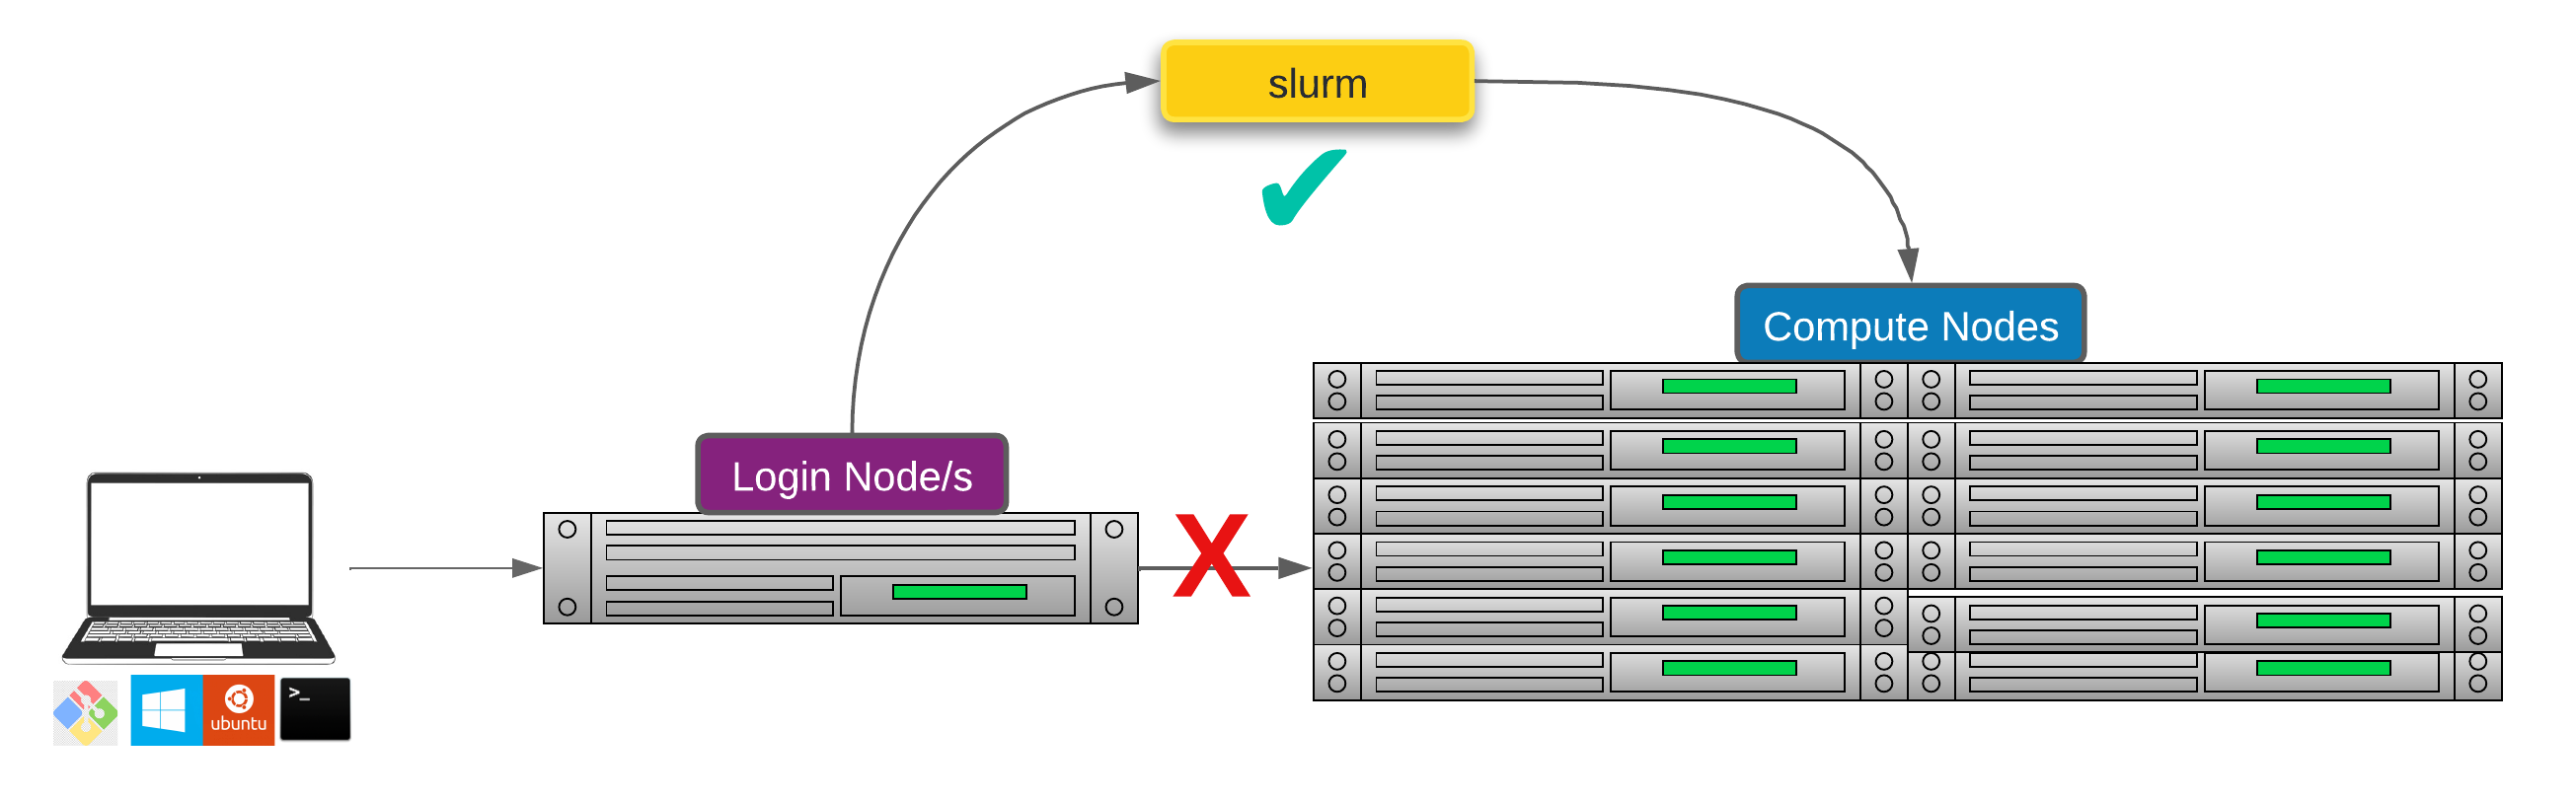
Researchers can not communicate directly to Compute nodes from the login node. Only way to establish a connection OR send scripts to compute nodes is to use scheduler as the carrier/manager
Life cycle of a slurm job
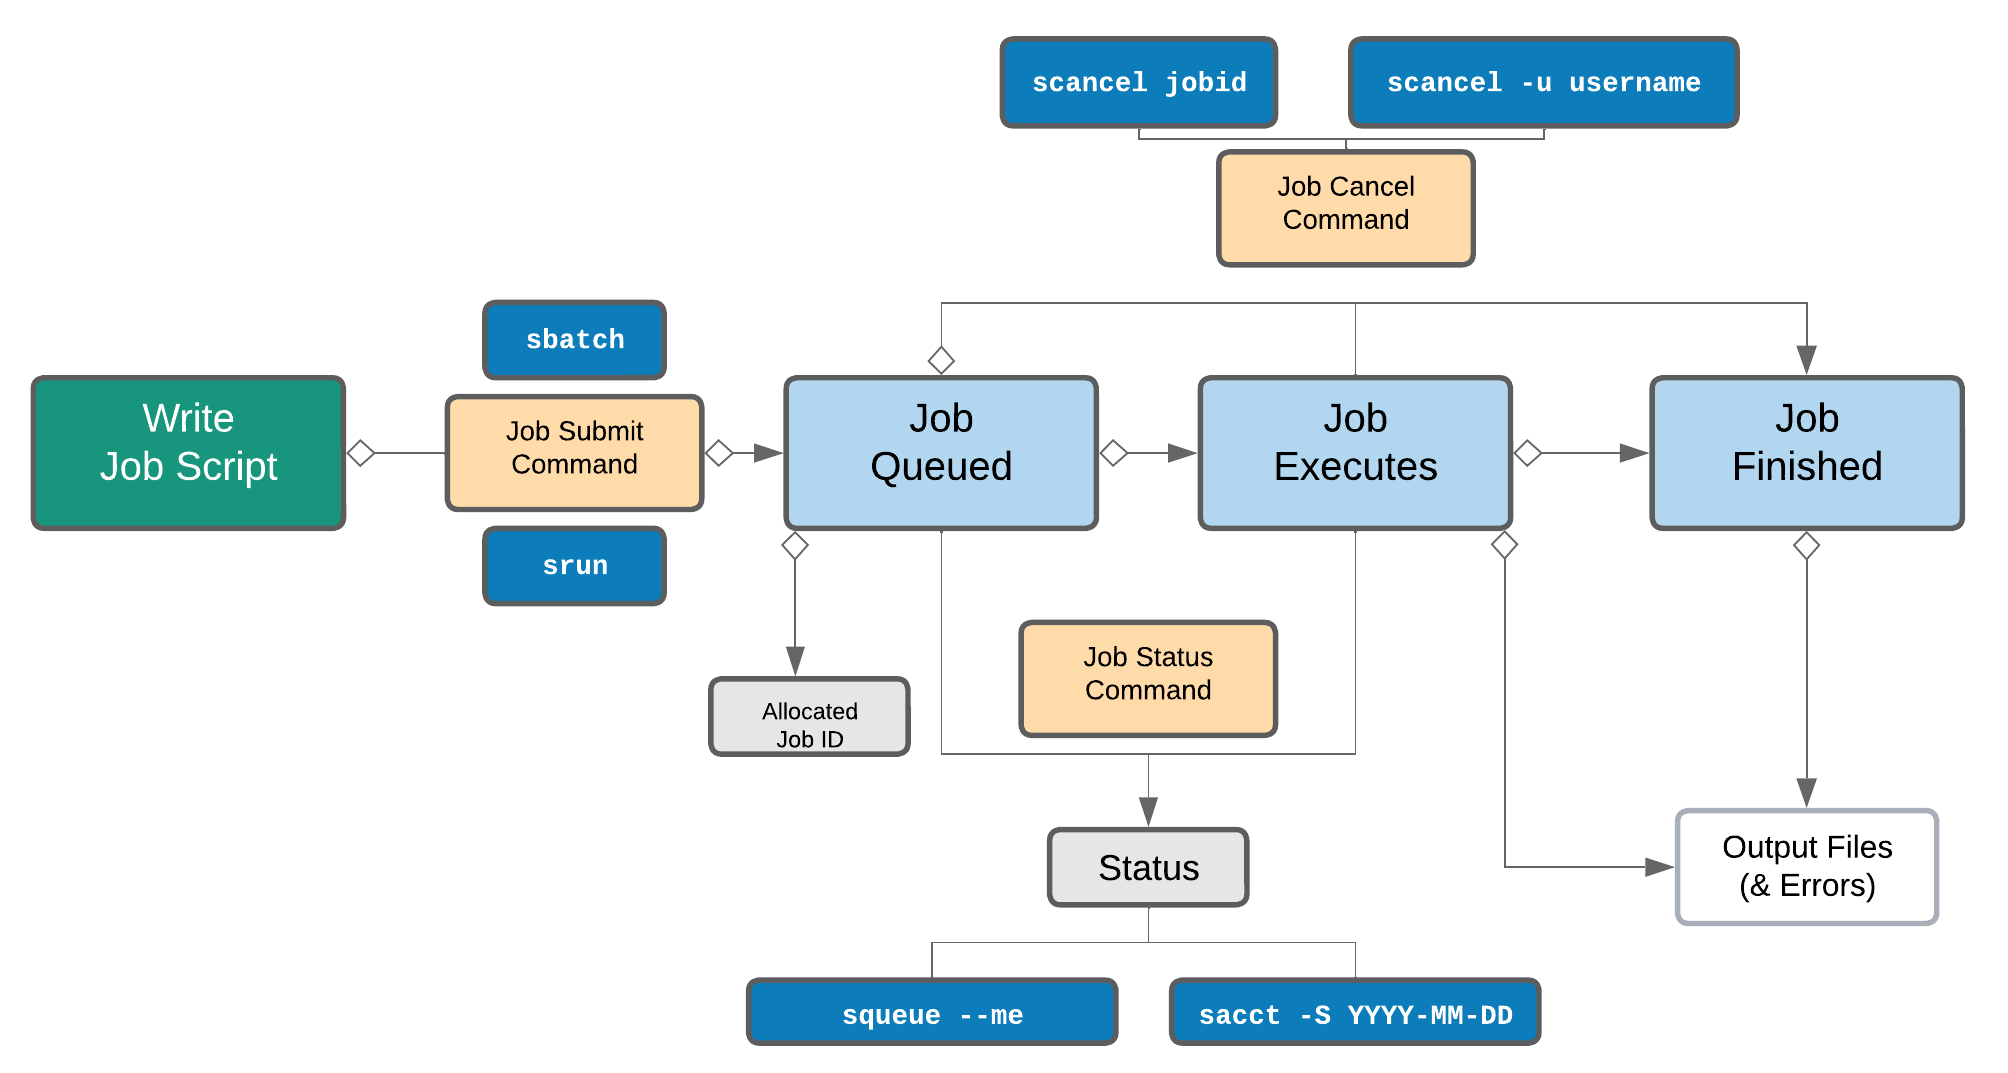
Commonly used Slurm commands
| Command | Function |
|---|---|
sbatch |
Submit non-interactive (batch) jobs to the scheduler |
squeue |
List jobs in the queue |
scancel |
Cancel a job |
sacct |
Display accounting data for all jobs and job steps in the Slurm job accounting log or Slurm database |
srun |
Slurm directive for parallel computing |
sinfo |
Query the current state of nodes |
salloc |
Submit interactive jobs to the scheduler |
Exercise 5.1 (Optional) - Check the state of the compute cluster
-
summary of current states of compute nodes known to the scheduler
-
similar to above but expanded
-
will print a long output as it is one row per compute node in the cluster
-
Explore the capacity of a compute node
Anatomy of a slurm script and submitting first slurm job 🧐
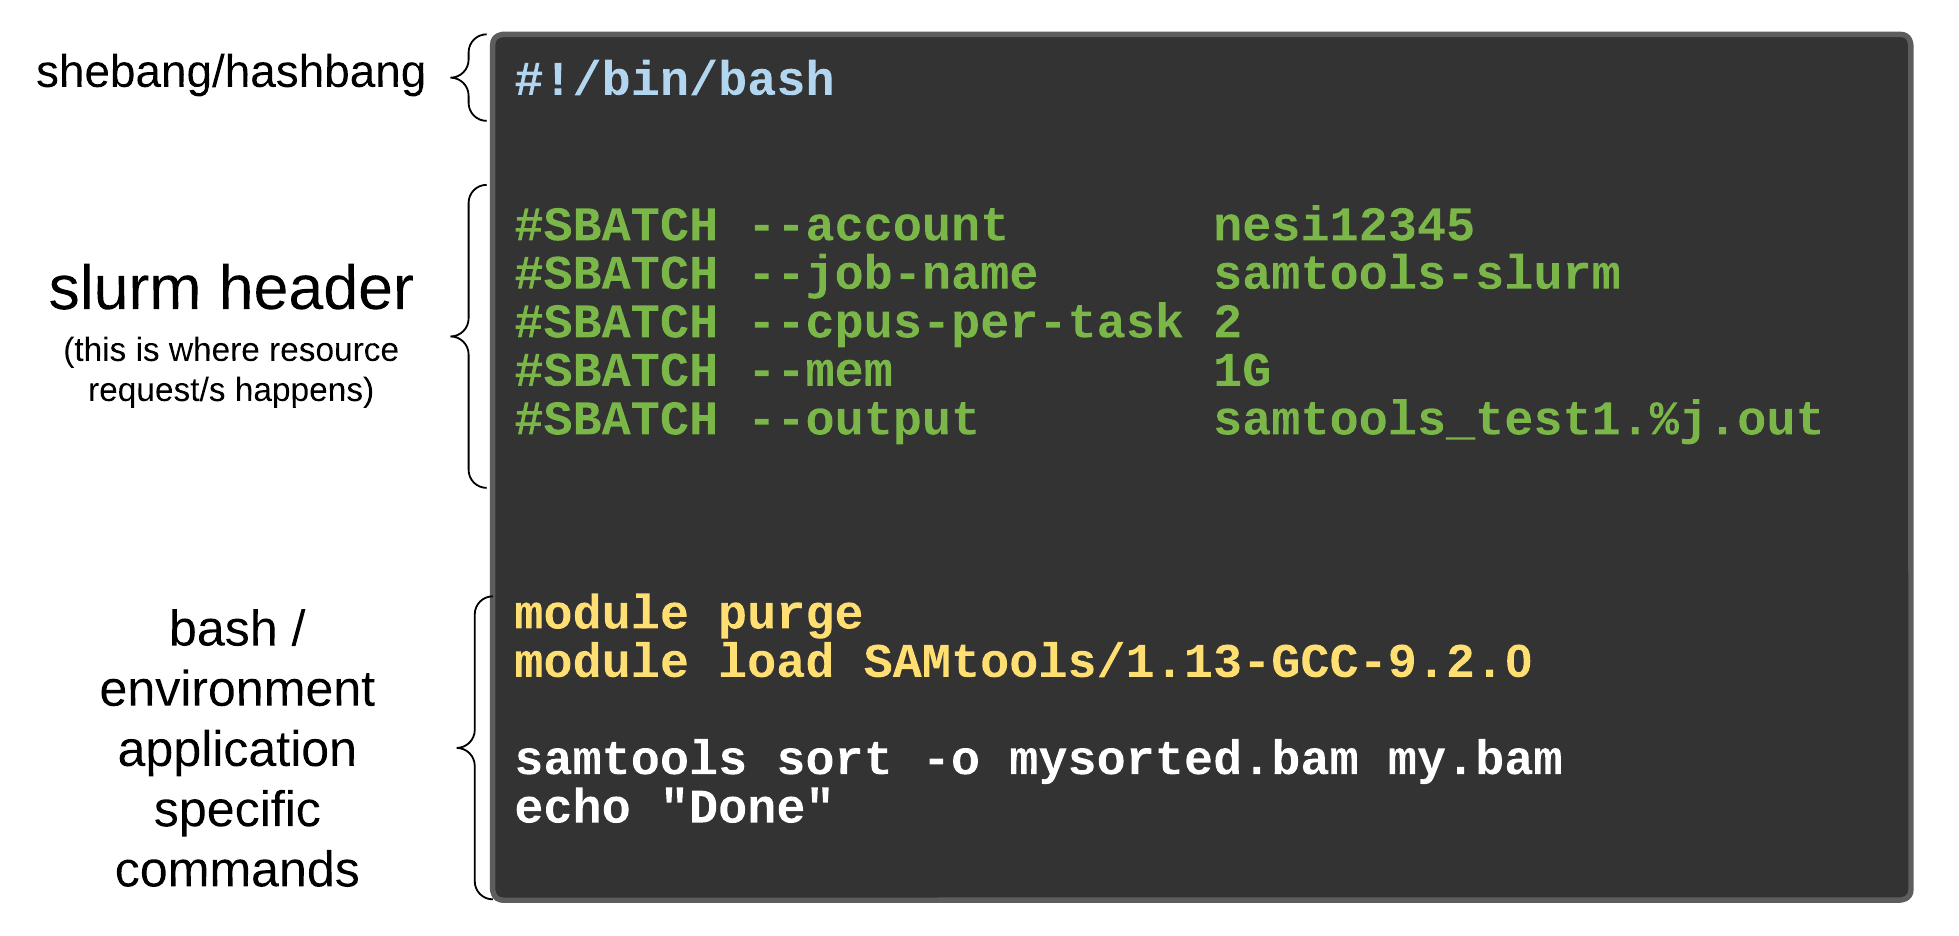
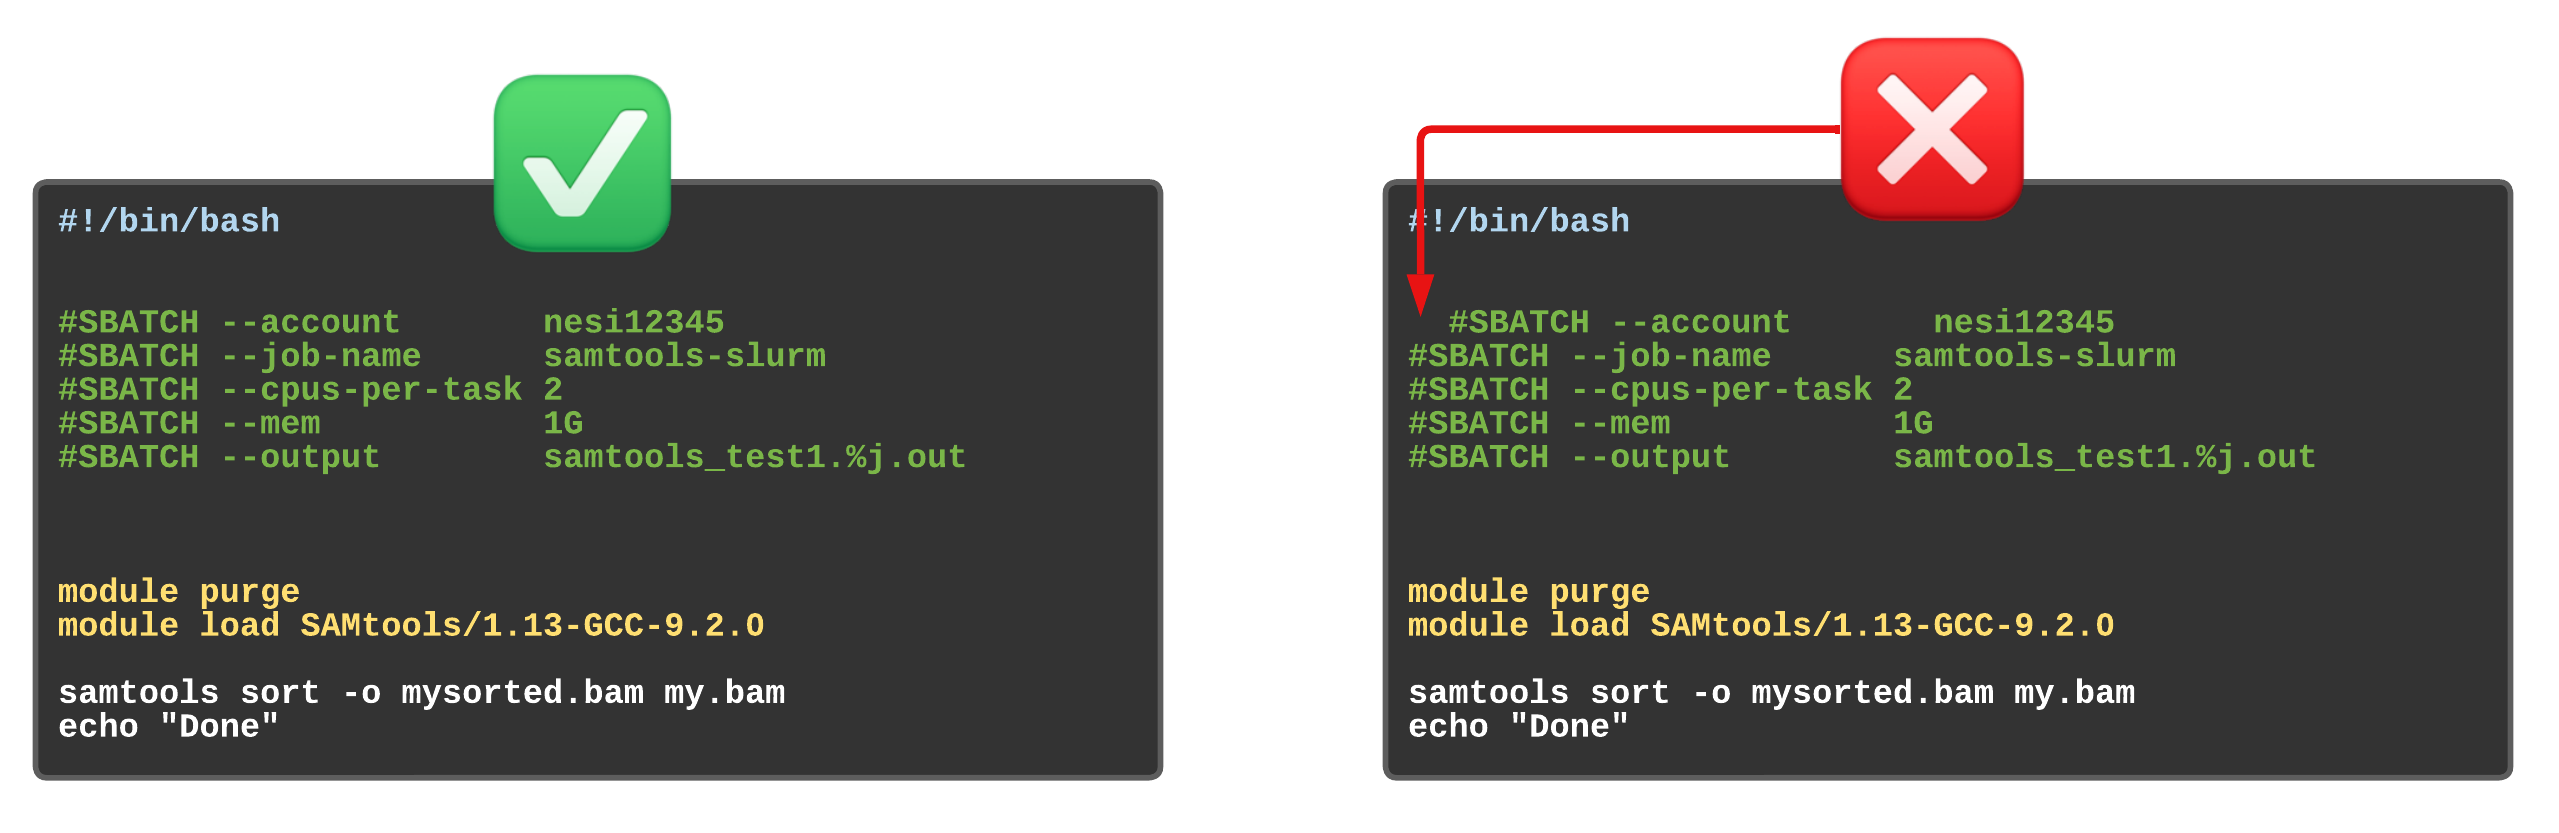
As with most other scheduler systems, job submission scripts in Slurm consist of a header section with the shell specification and options to the submission command (sbatch in this case) followed by the body of the script that actually runs the commands you want. In the header section, options to sbatch should be prepended with #SBATCH.
Commented lines #
Commented lines are ignored by the bash interpreter, but they are not ignored by slurm. The #SBATCH parameters are read by slurm when we submit the job. When the job starts, the bash interpreter will ignore all lines starting with #. This is very similar to the shebang mentioned earlier, when you run your script, the system looks at the #!, then uses the program at the subsequent path to interpret the script, in our case /bin/bash (the program bash found in the /bin directory
Slurm variables
| header | use | description |
|---|---|---|
| --job-name | #SBATCH --job-name=MyJob |
The name that will appear when using squeue or sacct. |
| --account | #SBATCH --account=nesi12345 |
The account your core hours will be 'charged' to. |
| --time | #SBATCH --time=DD-HH:MM:SS |
Job max walltime. |
| --mem | #SBATCH --mem=512MB |
Memory required per node. |
| --cpus-per-task | #SBATCH --cpus-per-task=10 |
Will request 10 logical CPUs per task. |
| --output | #SBATCH --output=%j_output.out |
Path and name of standard output file. %j will be replaced by the job ID. |
| --mail-user | #SBATCH --mail-user=me23@gmail.com |
address to send mail notifications. |
| --mail-type | #SBATCH --mail-type=ALL |
Will send a mail notification at BEGIN END FAIL. |
#SBATCH --mail-type=TIME_LIMIT_80 |
Will send message at 80% walltime. |
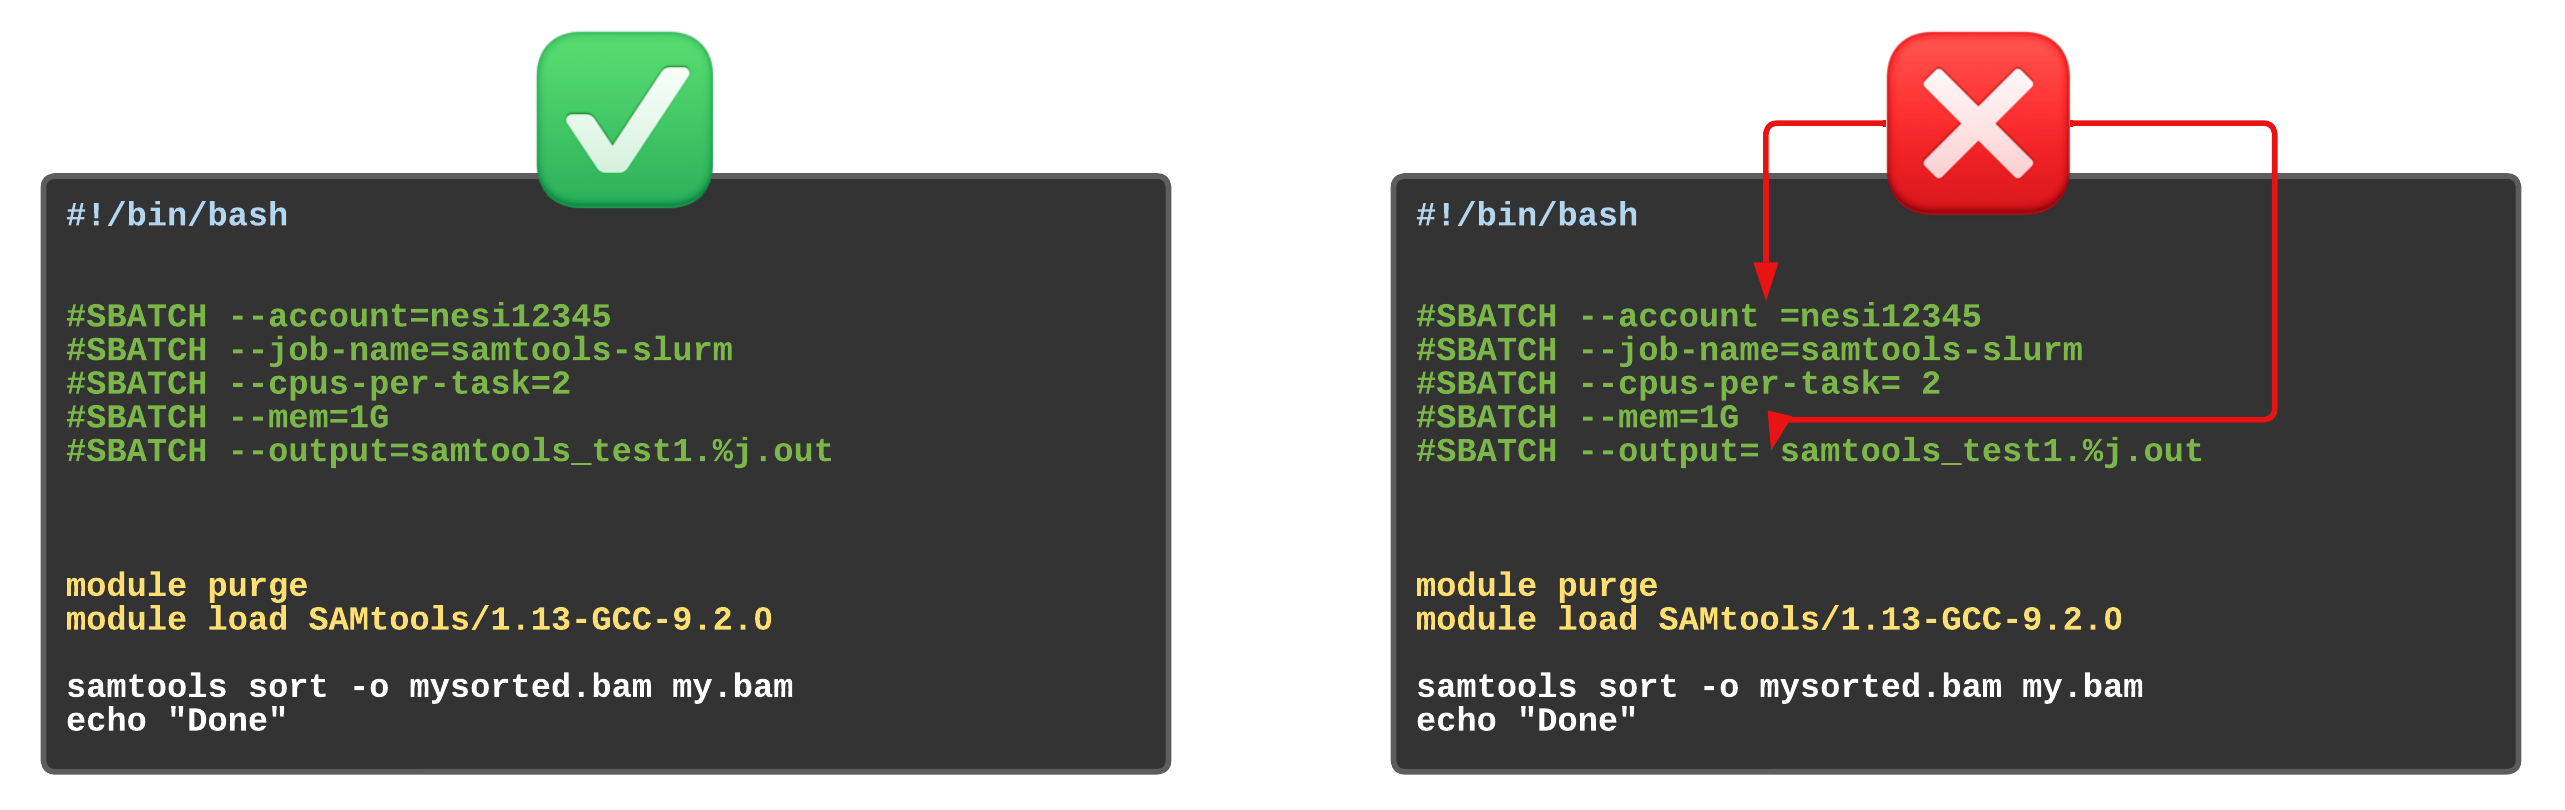
Assigning values to Slurm variables (formatting correctly examples)
Exercise 5.2
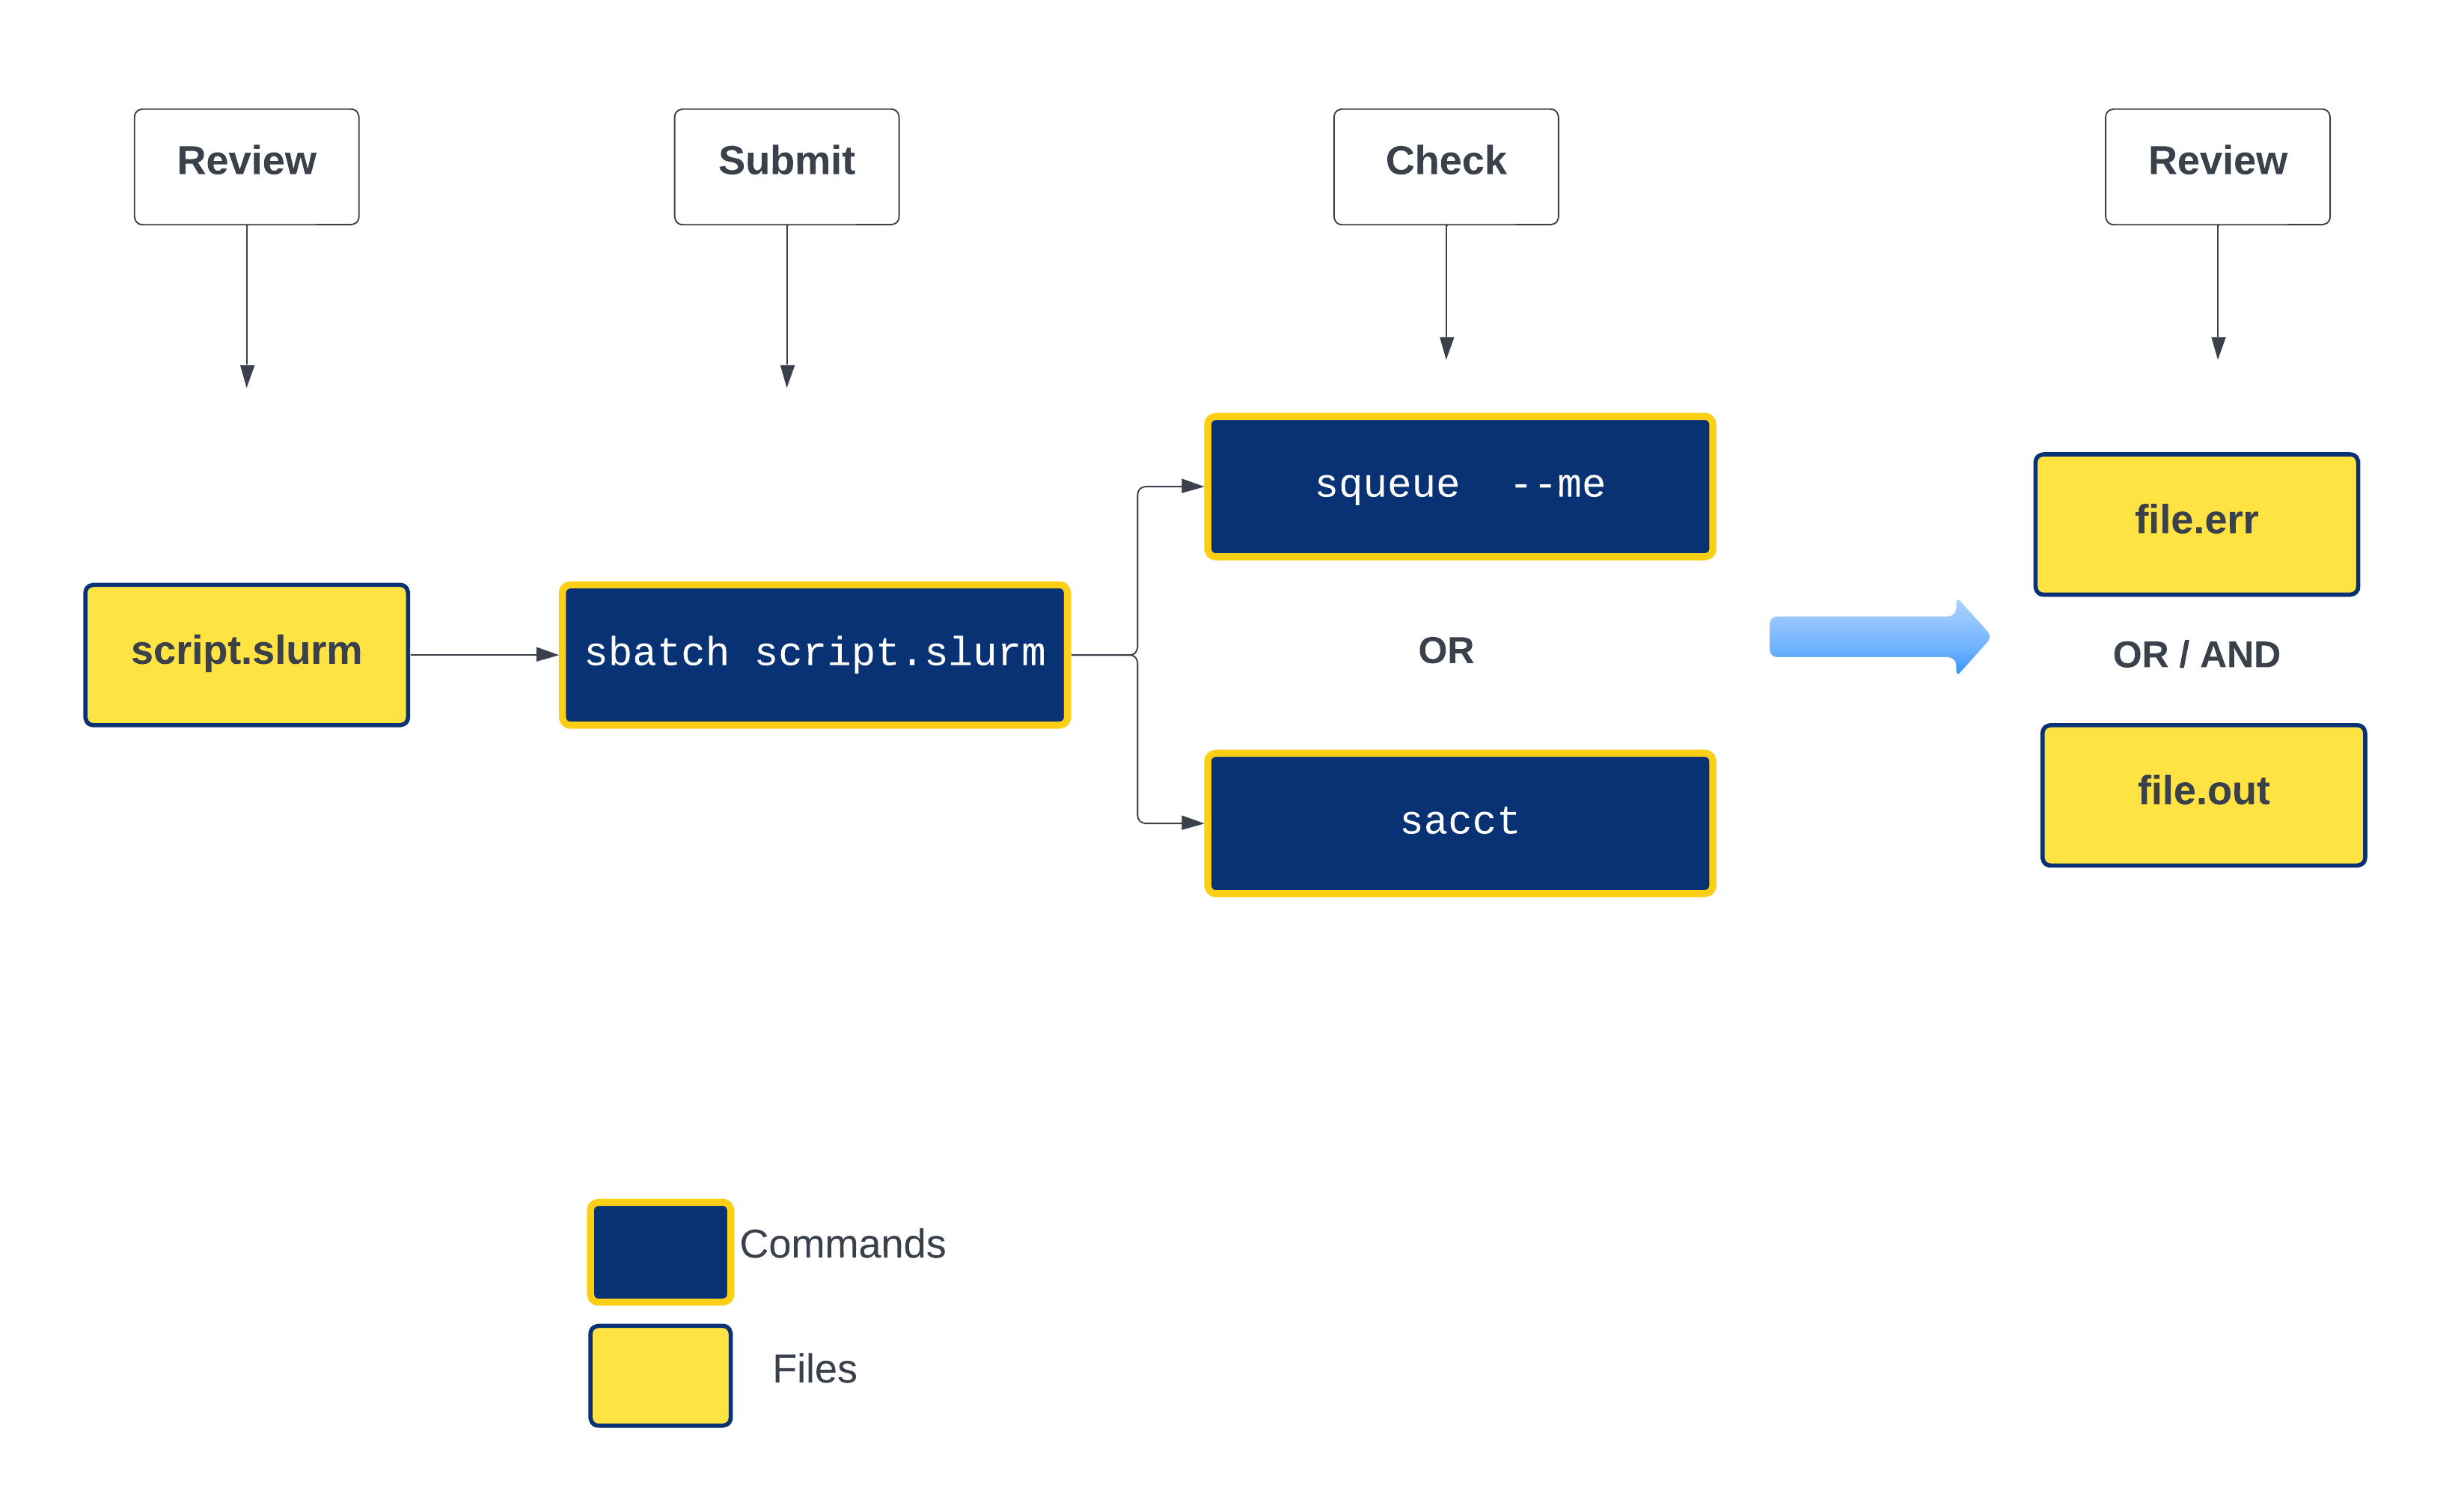
Let's put these directives together and compile our first slurm script. Below is a abstract version of the slurm life cycle to assist you with the process
-
First step is to create new working directories inside the existing
~/scripting_workshop/scheduler -
confirm the path is correct
-
create a new directory for this section and change the directory to it - Check for the follow up not
&&
The meaning of && and & are intrinsically different.
- What is
&&in Bash? In Bash—and many other programming languages—&&means “AND”. And in command execution context like this, it means items to the left as well as right of && should be run in sequence in this case. - What is & in Bash? And a single
&means that the preceding commands—to the immediate left of the &—should simply be run in the background.
-
use a text editor of choice to create a file named firstslurm.sl - we will use nano here
-
Content of
firstslurm.slshould be as below. Please discuss as you make progress#!/bin/bash #SBATCH --job-name myfirstslurmjob #SBATCH --account nesi02659 #SBATCH --time 00:02:00 #Format is DD-HH:MM:SS #SBATCH --cpus-per-task 1 #SBATCH --mem 512 #Default unit is Megabytes #SBATCH --output slurmjob.%j.out #SBATCH --error slurmjob.%j.err sleep 100 echo "I am a slurm job and I slept for 100 seconds" echo "$SLURM_JOB_ID END" -
Save and Exit
- Submit the script with
sbatchcommand - Execute
squeue --meandsacct. Discuss the outputs .i.e.
$SLURM_JOB_ID
$SLURM_JOB_ID is a Slurm environment variable.
- A full list of environment variables for SLURM can be found by visiting the SLURM page on environment variables
- These variables are great for recursive operations.
Assessing resource utilisation (cpu, memory, time)
Understanding the resources you have available and how to use them most efficiently is a vital skill in high performance computing. The three resources that every single job submitted on the platform needs to request are:
- CPUs (i.e. logical CPU cores), and
- Memory (RAM), and
- Time.
What happens if I ask for the wrong resources?
| Resource | Asking for too much | Not asking for enough |
|---|---|---|
| Number of CPUs | Job may wait in the queue for longer | Job will run more slowly than expected, and so may run out time |
| Drop in fairshare score which determines job priority | ||
| Memory | (above) | Job will fail, probably with OUT OF MEMORY error, segmentation fault or bus error |
| Wall time | (above) | Job will run out of time and get killed |
Exercise 5.3
Let's submit another slurm job and review its resource utilisation
-
Change the working directory to Exercise_5.3
-
Run
lscommand and you should see two files (one .R and one sl) and one directory named slurmout -
Review the slurm script bowtie-test.sl with nano and edit the corresponding sections (hint :email)
-
use
squeue --meandsacctagain to evaluate the job status -
Once the job ran into completion, use
nn_seff JOBIDcommand to print the resource utilisation statistics (Replace JOBID with the corresponding number) - Now review the content of
.errand.outfiles in /slurmout directory
Feeling adventurous 🤠 ? - Refer to Supplementary material on slurm profiling
Compiling slurm scripts for Variant Calling and RNA-seq episodes
👣 Choose your own adventure - compile a slurm script either for a variant calling or RNA-seq workflow.
Exercise 5.4 - Variant Calling Workflow 🧬 🔎
The purpose of this exercise is to compile a slurm submission script based on the script we wrote in episode 2 - Automating variant calling workflow
- Recommend creating a new directory for the exercise .i.e
ex_5.4 - Name the file is
variant_calling.sl(note that we change the extension from.shto.sl) -
Set slurm variables:
- name of the job as
variant_calling_workflow - number of CPUS as
2 - timelimit
15 minutes - amount of memory in GB
4G - generate .err files and .out
- an email notification at the end of the job
- name of the job as
-
We don't want to replicate input data in multiple places .i.e. be conservative in-terms how you use research storage
- Therefore, use the same reference genome file (assign the filename to variable
genomeand the trimmed read files (assign the path of these files to variabletrimmed) used in the first episode
Exercise 5.5 - RNA-seq workflow 🧬 📊
The purpose of this exercise is to compile a slurm submission script based on the script we wrote in episode 3 - RNA-seq workflow
- Recommend creating a new directory for the exercise i.e.
ex_5.5(or make this as part of the slurm script) - Name the file is
rnaseq.sl(note that we change the extension from.shto.sl) -
Set slurm variables:
- name of the job as
rnaseq_workflow - number of CPUs as
4 - timelimit
15 minutes - amount of memory in GB
4G - generate .err files and .out
- an email notification at the end of the job
- name of the job as
-
We don't want to replicate input data in multiple places i.e. be conservative in terms of how you use research storage
- Therefore, use the same reference genome file (assign the filename to variable
genomedir) and the trimmed read files (assign the path of these files to variabletrimmeddir) used in the RNA-seq episode
Optional: recreate the genome index files as part of this script, or make use of the index files we already generated in ${genomedir}